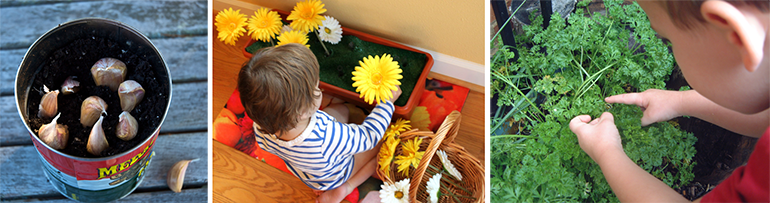
Guide for Making Indoor Gardens with Young Gardeners
14 FANTASTIC PLANTING ACTIVITES
1. Poster Art – “What Plants Need to Grow”
This activity teaches children what plants need to grow and how they can help in this process.
 Resources:
- Poster paper
- Color markers or crayons (yellow, green and blue, etc.)
- White glue
- Soil
- Bag of different kinds of seeds
- Instructions:
- Show children the seeds, have them hold and examine. Ask children if they know what the seed needs to grow into a plant.
- Ask or tell children what kind of seed it is and show them a picture of the plant from the seed packet.
- Use your poster paper to make a picture depicting plant needs. Draw or have a child draw a large yellow circle to represent the sun. Draw some of the sun’s rays toward the bottom of the paper.
- Use glue to make a line across the bottom of the paper to represent the earth. Sprinkle soil on top of the glue and let dry.
- Use green to draw plants growing out of the soil. Place at least some plants under the rays of the sun that extend to the ground.
- Finally, use your blue color to make raindrops or little pools of water around the green plants you have drawn.
- Hang Poster on wall next your garden. You will use the poster throughout the year to post pictures of the plants your class grows.
- Teach children the song, “Soil, Water, Sun and Air". Make up your own tune to the words, “Soil, water, sun and air – give us everything we eat and everything we wear".
- If you choose, tell your children that plants do not need to eat food to get their nourishment. Plants “eat” sunlight. The fancy word for this is Photosynthesis.
- This is a good time to teach your children the words Shomrei Adamah. In Hebrew this means “caretakers or keepers of the earth". Tell children that every time they plant a seed or water a plant, they are being Shomrei Adamah.
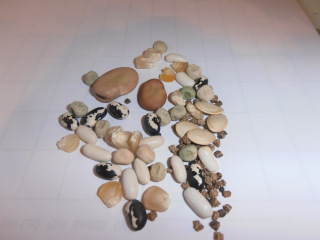
2. Seed Fun – Lots of Different Kinds of Seeds
This activity teaches children that seeds come in all colors, sizes and shapes. According to Jewish tradition, every seed has its own shape, color and size to help it grow better.
 Resources:
- Plastic bags or bowls with variety of seeds
- Seeds – corn, pea, bean, sunflower, tomato, radish, avocado
- Fresh fruit and vegetables
- Plant pictures (use the picture on the side of the seed package or print picture from Internet)
- Instructions:
- Have children reach into the bag or bowl of seeds and let handfuls fall through their fingers. Encourage them to listen to the sound the falling seeds make and to look at the variety among the different seeds.
- Have children pick out different kinds of seeds and look more closely at their color, size and shape difference.
- Play the game, “Guess the Plant.” For each seed, ask children if they can guess what kind of plant it will grow into. (You may want to start with something children will recognize, such as a corn or sunflower seed.)
- Identify seeds and for each one show children a picture of the mature plant it will become. You can use the pictures on the seed packages or print a picture from Internet.
- Talk about how people are as different as plants and how these differences are good, natural and necessary (just as they are for the seeds).
- You may want to read the following sentence from Genesis and explain that it is saying that all fruits and vegetables have seeds inside of them. Ask your children if this is true. (Genesis 1:12) And the earth grew all different kinds of plants and trees with seeds inside of them so that they can grow more plants of the same kind.)
- Slice open a cucumber, tomato, squash and apple. Scrape out the seeds and show to children. Show children how some seeds (such as apple) are inside their own little case to help protect them from being eaten. Other seeds (such as tomato) have no protection and are meant to be swallowed.
- Save the seeds; let them dry to use for later planting if you choose.
- Ask children how it is possible for a tiny little seed (you might show them an apple seed) can grow into a huge apple tree. Suggest silly possibilities such as, “Maybe the way we grow a seed into a tree is by putting it under our pillows when we go to sleep at night.” If you have already done the lesson on what it takes to grow a seed, this is an opportunity to see how much your children remember and to reinforce the teaching. Review the need for soil, water and sunlight.
CHILDREN & NATURE NETWORK
Founded in 2006 by a small group of educators, writers, and community leaders who shared a deep concern about children’s disconnection from nature, the Children & Nature Network (C&NN) supports and informs organizations working to reconnect children with nature. The network provides opportunities for sharing information, success stories, and resources for building community coalitions to ensure that all children have a chance to experience nature firsthand.
The organization’s Web site (www.cnaturenet.org) offers families and educators the latest news and research as well as practical advice, including ways to apply newfound knowledge at home, at school, and in the community.
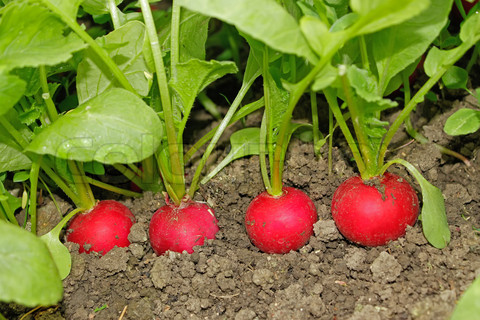
3. Radish Planting in Soil
 Resources:
- Radish seeds
- Radishes with green top attached
- Potting soil
- Aluminum pan for planting
- Masking tape
- Instructions:
- Tell children they are going to start planting today. Show them the radish seeds and ask if they know what kind of seed it is. Tell them it is a radish seed and show them the radishes you brought to class.
- Use your Poster (See Activity 1) to show children how the green part of the radish grows above the ground and the radish part grows below the ground. Tell children the part of the plant that grows below the ground is called a root. (Ask children if they every drank root beer. Tell them it is called this because the roots of certain trees (such as birch and sassafras) used to be used to make the drink – today this drink is made from artificial flavors mostly).
- Have children help scoop soil from the bag or container into the aluminum pan to be used for planting.
- Cut small pieces of masking tape, approximately 1 inch in length. Have children come to the work area where you can spread out a lot of radish seeds. Have children press the sticky part of their piece of tape onto the seeds. Several radish seeds will stick to the tape.
- Have children place their pieces of tape on top of the soil in the pan and cover with more soil (approximately ¼ inch).
- Have children water the soil thoroughly (until water starts to flow out or when you poke a finger several inches into the soil and feel it is wet).
- Label your pan (paste picture of radish on the side so children will recognize) and mark the date planted. This will help you to know exactly how long it takes for the plants to grow – information that will make your next indoor garden easier to plan and execute.
- Paste a picture of a radish on your Poster (See Activity 1).
- Say or sing the shehecheyanu blessing and tell children why you are doing so.
The shehecheyanu blessing is recited, in addition to the regular blessing, whenever doing something for the first time that year, like doing a mitzvah, such as the first lighting the Chanukah candles, reading the Megillah on Purim, and shaking the lulav and etrog on Sukkot.
In addition the first time each year one eats a fruit or vegetable which is seasonal, i.e., one which grows only at a certain time of the year, the fruit is considered a "new fruit" and this special blessing is recited.
בָּרוּךְ אַתָּה יְיָּ אֱלֹהֵינוּ
מֶלֶךְ הָּעוֹלָּם שֶהֶחֱיָּנוּ וְקִיְמָּנוּ
וְהִגִיעָּנוּ לַזְמַן הַזֶה
Transliteration:
Ba-ruch A-tah A-do-noi E-loi-hei-nu
Me-lech ha-o-lam she-he-chee-ya-nu v'ki-yi-ma-nu
vi-hi-gi-ya-nu liz-man ha-zeh.
Translation:
Blessed are You, Adonai our G-d,
Eternal Guide, who has granted us life, sustained us
and enabled us to reach this occasion.
Research indicates that the best way to ensure that children become good stewards of the environment later on is to nurture in them a love and appreciation for nature when they are young. (Chawla 2006).
Chawla, L. 2006. Learning to Love the Natural World Enough to Protect It. Barn 2: 57–58. (Barn is a quarterly published by the Norwegian Centre for Child Research at the Norwegian University of Science and Technology, in Trondheim.
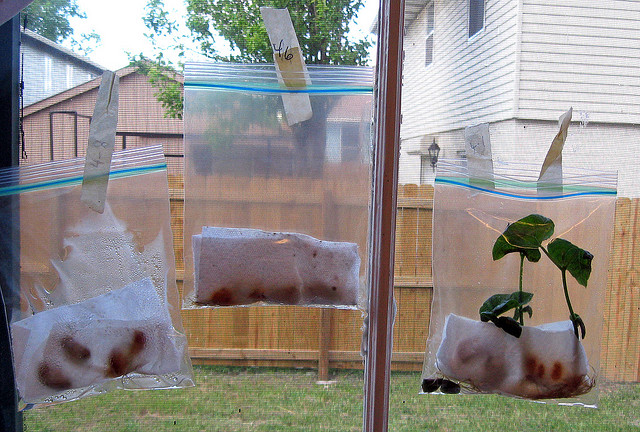
4. Ziploc Bag Beans
 Resources:
- Ziploc plastic bags for each child
- Paper towel pieces (approximately 3x5 inches)
- Bean seeds (any kind of bean works – try different ones)
- Water
- Scotch tape
- Instructions:
- Give each child a Ziploc bag and ask them if they can guess what they are going to do with the bags.
- Have each child pick three bean seeds from your collection.
- Have each child wet a piece of paper towel and push it into the bag. It is okay for the piece of towel to crumple.
- Place bean seeds inside the bag, in the paper towel or between the towel and the side of the bag. Zip shut.
- Tape to window. If your windows get too cold, tape on wall next to window or place on table in front of window.
- Have children check bags each day to see what is happening.
- Eventually the beans will begin to sprout. When roots are several inches long, transplant to soil. To do this, make a hole an inch deep, put the seed in (making certain all of the roots are in) and cover with dirt. Water.
- Once planted, add a bean picture to your Poster (See Activity 1).
- Tell children that once the seeds begin to grow roots then it will be time to put it in the soil. (This last explanation may be important so that children do not get confused having learned that seeds need to be put in soil to grow.)
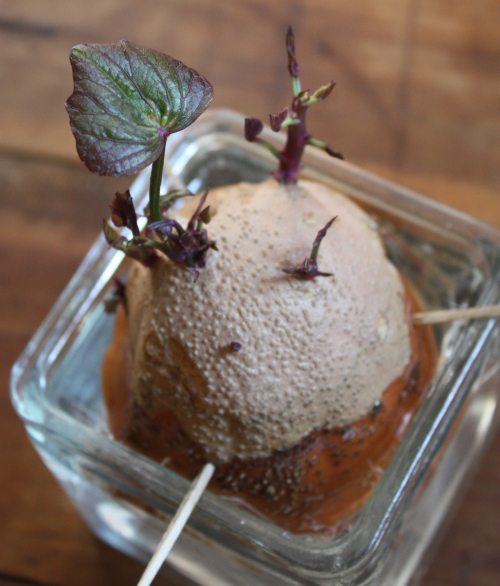
5. Avocado Seed Starter
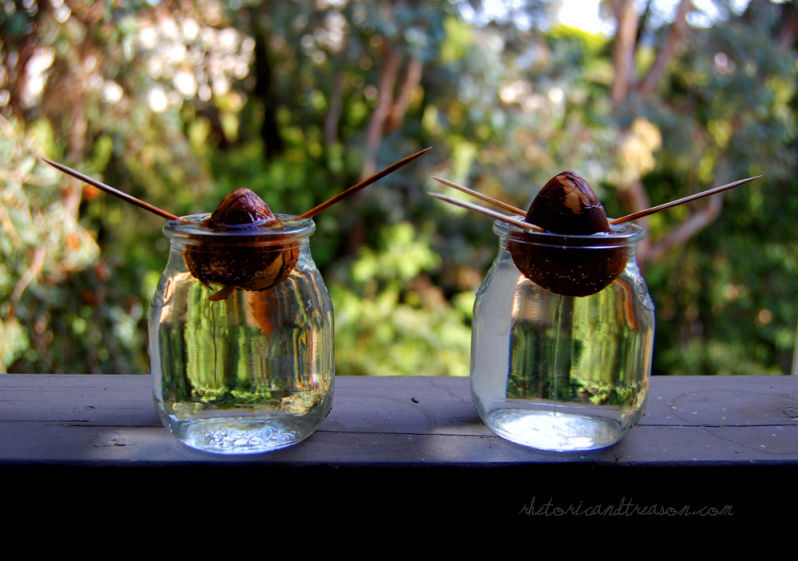 Resources:
- Resources
- Avocado seed that has dried a few days
- Clear plastic cup, iced tea size
- Toothpicks
- Water
- Avocado fruit
- Instructions:
- Tell children that this is a fruit that grows in very warm places and not where snow falls in the winter.
- Ask children if they have eaten an avocado or guacamole, which is made from avocado.
- Cut the avocado lengthwise all the way around the fruit. Hold both sides and twist back and forth until they come apart. Show children the avocado seed inside.
- Remove, clean off excess fruit and place aside to dry.
- Take your dry avocado seed. Show children how one side of the seed is more egg shaped and one side is more flat. Turn the seed so the egg shaped side is on top and the flat side is on the bottom (opposite what you might think).
- Poke a toothpick into the seed about ½ inch from the top. Turn the seed a quarter turn and poke in another toothpick. Continue until you have four or five toothpicks around the entire seed.
- Fill cup with water and gently place seed into the cup. The toothpicks will rest on the lip of the cup and keep the seed from dropping into cup.
- Place a mark with a magic marker on the side of the cup showing where the water level needs to be. This mark should be high enough so that over half of the seed is in water. Do not cover the entire seed with water.
- Have children check each day and add water as necessary.
- It will take a week before you begin to see roots sprouting. Soon afterwards, the rate of growth will explode.11.Transplant seed when roots begin to fill the cup. Use a large clay pot and fill with your potting soil. Make a hole in the middle and place seed into the hole. Water and place in the sunniest place you have in your room.
- Add a picture of an avocado to your Poster (See Activity 1).
TIPS FOR GARDENING WITH YOUNG CHILDREN
- Gardening offers so many opportunities for sensory play and discovery. Why not encourage children to feel, smell, touch and taste (within reason) plants, herbs, vegetables & flowers growing in the garden. Let them plunge their arms into the soil/compost & explore its properties and texture.
- Gardening is a great way to encourage young children to care for and nurture living things. It enables them to consider what plants need to grow, what shelter/support they may need, and how simple actions can make a difference. It is also a great introduction to life cycle.
- Gardening can be a child led experience. Talk together about what they would like to grow and let them choose what they wish to plant. What plants do they like to eat, what is their favorite colored flower, etc. If children are engaged in the activity they are likely to gain more from the experience.
- Allow time and space for children to ponder and wonder as they experiment in the garden. Do not be too focused on getting all the seeds planted by a set time, allow for some freedom to make discoveries and new connections with the natural world.
- Keep a few seeds back so that once plants are growing children can compare the seed to the plant. This gives them an opportunity to observe the differences, and to consider the time it is taken for the changes to occur.
6. Pineapple Cutting
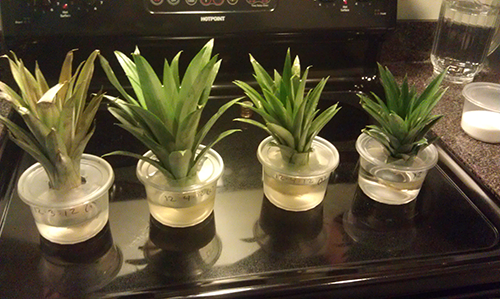 Resources:
- Pineapple with top still attached
- Clear plastic cup, iced tea size
- Instructions:
- Ask children if they have ever eaten a pineapple. Show children the pineapple you brought to class.
- Cut the top off of the pineapple leaving 2 inches of fruit attached.
- Cut excess fruit off the sides of the top piece.
- Place the top in cup of water. After 7-10 days, you will see roots starting to grow from the pineapple. When roots begin to fill the cup, transplant to a large pot. Fill pot with planting soil, make a hole in the middle and place pineapple top in soil. Keep the leaves above the water line. These leaves may die but so long as the roots are growing your plant is healthy.
- If the water turns milky colored, empty and put in new water.
- Cut the rest of the pineapple into pieces and have a class treat.
- Add a picture of a pineapple to your Poster (See Activity 1).
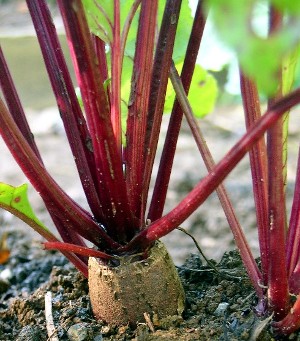
7. Beet and Carrot Plant Basin
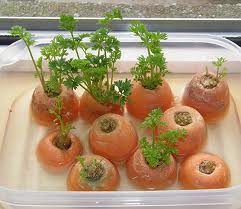
 Resources:
- Beets with green tops still attached
- Carrots with tops still attached
- Aluminum baking pan
- Colorful gravel or shells
- Water
- Instructions:
- Ask children if they have eaten carrots or beets. Show them what you brought to class.
- Cut the tops off of carrots and beets leaving 1/2 inch of vegetable attached.
- Place gravel and or shells in the bottom of aluminum pan and put ¼ - ½ inch of water in pan.
- Carefully set cut end of beets and carrots on bottom of aluminum pan using the gravel and shells to balance.
- Make sure the green part of beets and carrots stay out of the water.
- When roots begin to stretch out in the pan, transplant to a pot. You can plant carrots 2 inches apart and beets 3 inches apart from each other. Water and place in sunny window or under grow light.
- You can cut beet and carrot pieces to serve as a class treat. You can also use the rest of the beet as a natural dye for pictures. Just press against a piece of paper or white cloth.
- Add beet and/or carrot pictures to your Poster (See Activity 1).
8. Heart Seed Planting
- Resources:
- Bean or pea seeds
- 3x5 inch pieces of plastic wrap, one for each child
- 2x2 inch piece of paper towel
- Easy to break yarn 1 foot long piece for each child
- Instructions:
- Give each child a piece of the plastic wrap with a wet piece of paper towel lying on top.
- Have children place seed on top of the paper towel.
- Fold towel around the seed and wrap the plastic wrap tightly around the towel. Twist the ends of the plastic wrap to hold.
- Tie a piece of yarn to each side of the plastic wrap.
- Have children wear yarn around their necks and tuck their seed packages inside of their shirts/blouses. Alternatively, you can safety pin the yarn to their clothing. The heat of their bodies will help germinate their seeds.
- Send note home to parents explaining the project and telling parents to place the seed next to their child’s bed at night. In the morning, children should wear the seed again. It takes 4-5 days for seeds to germinate.
- After 2 days, check to make sure the paper towel is still moist. If it is not, wet and rewrap.
9. Popcorn Planter
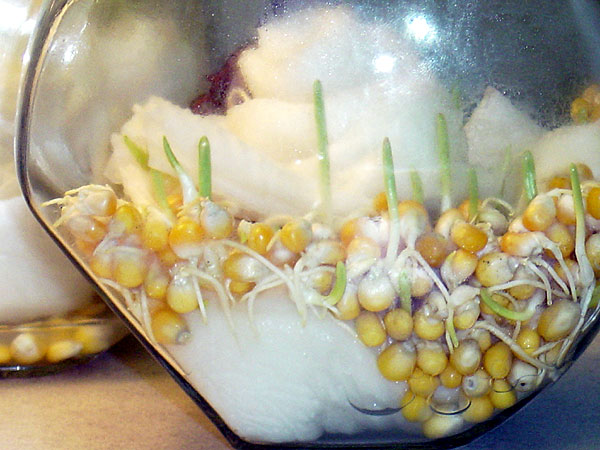 Resources:
- Large clear plastic container
- Wet paper towels
- Ears of corn
- Corn seeds
- Instructions:
- Show children the ears of corn you brought to class. Ask if they have seen corn still inside of its green covering called the husk. Tell children that this is what the corn looks like when it’s growing, that corn growing on stalks is called “ears” and that corn in a field can grow three times as tall as the children.
- Place wet paper towels in the middle of your plastic container. Gently wad up the paper, wet it and place in the container.
- Place half a dozen corn kernels (seeds) between the paper towel and the side of the plastic container. This will ensure that children can see the corn germinate.
- Cover top with plastic wrap or container top to keep moisture from evaporating.
- Place a picture of a corn plant on your Poster (See Activity 1).
- Check every few days to see if paper towel needs to be remoistened.
- Write the date you started the corn on a piece of tape and place on side of the container. Later record in your book of notes the amount of time it took for the seeds to germinate.
10. Tomato Plants
- Resources:
- Tomato seeds or seedlings
- Soil
- Potting container
- Note:
- You have a very good chance of being able to get tomatoes to fruit and if you decide to try this activity, use cherry tomatoes or one of the varieties that takes less time for the fruit to develop. Ask someone for help when purchasing tomato plants or look on the side of the seed package for fruiting time if starting from seeds.
- Instructions:
- If you start from seed, be prepared to have patience. It will take a week or more for your seed to germinate and several months before you see flowers and any sign of fruit. You may have to start from seed if you plant between September and April. Few garden departments carry tomato plants for sale in the winter. In the spring, you can purchase tomato plants that are already 10-20 inches tall and may even have yellow flowers starting to bloom. These plants will produce tomatoes in 60-70 days.
- If you start with seeds, plant several in a 3 inch peat pot and water well. Place in a sunny area of room or under grow light in evenings.
- When plant is nearly as tall as the pot, transplant it into a container at least 3 times the size of the original. Water thoroughly 1 or 2 times a week.
- When plant begins to outgrow the new container or when its roots begin to poke through the holes in the bottom of the container, it is time to transplant it one last time. Select the largest container you can find. It should be at least 2 feet deep by 2 feet wide. It can be much larger (such as a large trash can). Be sure to make drainage holes and place 2-3 inches of large gravel or rocks in the bottom. Place in sunny area and water as before.
- When the tomato plants produce yellow flowers, you may have to move them outdoors to be pollinated by bees. Leave out during days when you see bees flying around (or when temperatures are at least in the 60 degree F. range).
- Add a tomato picture to your Poster (See Activity 1).
11. Mint Planting Fun
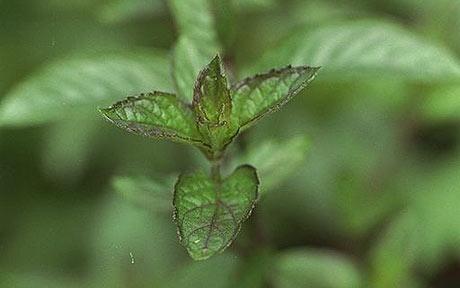 Resources:
- Mint plants or seeds
- Soil
- Pot for planting or large aluminum baking pan
- Clear plastic cup filled with water
- Cuttings (also called sprigs) of the mint plant
- Instructions:
- If you are planting mint seeds, fill a large aluminum baking pan with soil and sprinkle seeds onto the soil. Gently work the seeds into the soil using plastic fork, spoon or fingers. Water thoroughly and place in semi-light window.
- After plants are several inches high, transplant into a larger container. Use a container at least 12 inches deep (more if possible). Fill almost to the top with soil. To transplant, break apart the mint in the aluminum pan and lift out a hunk that is the size of your hand. It is okay to break roots if necessary to remove the hunk of mint plants.
- Be sure the new pot has holes in bottom for drainage and at least an inch of gravel or large rock (1-2 inches in size). Make a hole in the soil in the new pot and place the hunk in the soil. Make hole large enough to fit all of the roots. Fill around sides with soil but do not cover the stems of the plants.
- Water thoroughly and place in more direct light. Check each day and water when you can feel the soil is getting dry (poke a finger in).
- Add a picture of mint to your Poster (See Activity 1).
- In the springtime, you can purchase mint plants that are already 6-12 inches in height. As soon as you bring them back from the garden center, transplant them into containers at least 3 times the size of the original. Water thoroughly.
- Mint grows very easily and loves to spread to fill the space it is given. As soon as your plants begin to spread out and their stems lengthen, feel free to cut them. So long as you do not pull out the plant by its roots, it will continue to grow and thrive.
- As an alternative, cut several sprigs (about 5 inches off the ends of the mint plant) and place in a plastic cup filled ½ to the top with water. After a week or so, you will see roots beginning to develop on the sprigs. Transplant to new pot. These cuttings or sprigs will grow into full mint plants.
- You can use your mint to make mint iced or hot tea, pick sprigs just to smell or use in a Havdalah Spice Bundle. (See Activity H)
SOIL EXPLORATION
As part of your indoor gardening unit, you can also introduce the children to different types of soil.
Bring in samples of soil, sand and clay for your children to observe. Let them use hand lenses to look at it closely. Encourage them to feel it and smell. Provide small cups and shovels so that they can pour it and move it from place to place. When everyone has had a chance to explore, let them share their observations.
Once your children have had the opportunity to work with the different soils, ask them which one they think will be best for growing plants. After discussing their predictions and why they chose them, you can plant the same type of seed in soil, clay and sand. Observe them over the next few weeks and talk about what happened in each soil type.
12. Potato Planting
 Resources:
- Potatoes
- Toothpicks
- Clear cup, iced tea size
- Instructions:
- Bring some potatoes to class to show the children. Talk with your children about potatoes. Who likes potatoes? Who likes French Fries? Ask children if they knew that French Fries were made from potatoes. And, ask children if they think potatoes grow on top of plants like flowers or under the ground. (Children are usually amazed to learn that potatoes are underground.
- Use a whole potato that you have left in a paper or plastic bag for a few weeks in a dark area of your kitchen. You should see the roots beginning to grow already. The little spots on each potato are called the potato’s eyes and it is out of these that the roots grow.
- Poke tooth picks into the potato about 1/2-1 inch from one end. Place potato in cup with water. Be sure the water does not entirely cover the potato.
- Roots will fill the cup and dark green leaves will begin to grow out of the top of the potato. When this happens, transplant to a trashcan container and place in sunny area of room or under grow light. Be sure to poke holes in container and fill with several inches of large gravel or rocks about 2 -4 inches in size.
- Explain to children that potatoes grow under the soil and they can even be dug up in the middle of winter time – which might explain why we eat potatoes on Chanukah.
- Add the picture of a potato to your Poster (See Activity 1).
13. Parsley Planting
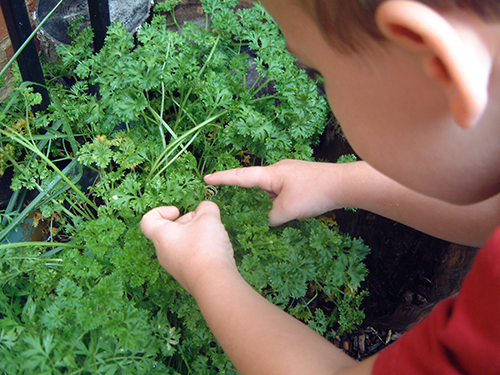 Resources:
- Several aluminum baking pans or other planting containers
- Parsley seeds
- Fresh parsley (if available)
- Soil
- Instructions:
- Show children the fresh parsley you brought to class and ask them if they know what it is. Pass out pieces for children to try. Tell children this is one of the foods we use at the Passover Seder. Explain its use if you choose. Tell children they are going to try to grow parsley.
- Fill aluminum pans with soil. Give each child a piece of masking tape and have them push sticky side down into seeds.
- Have child place their taped seeds onto soil and cover with ¼ inch of dirt.
- Water thoroughly and place in window with indirect sunlight.
- When plants start to grow, thin by removing some of them. Leave 1 inch of space between plants. If you are able to remove the little plants with their roots, try transplanting the ones you remove into another container.
- Trim the tops of the parsley plants when they begin to leaf send home with children in a Ziploc bag.
- You can continue to grow the parsley if you continue to trim the leaves every few weeks after the first cutting.
- Add a picture of parsley to your Poster (See Activity 1).
Celebrate Tu B'Shevat by planting parsley seeds in individual terra cotta pots that the children decorate themselves. Over the next 6 weeks, watch as they begin to sprout and grow into hearty parsley plants... just in time for the Passover Seder!
14. Basil and Sage Spice Bundles
- Resources:
- Large planting pots (at least 12 inches in diameter)
- Soil
- Basil or sage seeds
- Dried basil or sage leaves (or any other leaves that smell good)
- Colored yarn
- Craft feathers
- Instructions:
- Starting from seed is going to take some time but it will work. Or, you can see if your garden center has young herb plants. You can use anything that smells good to you. If starting from seed, follow directions for planting parsley seed (See Activity F – Parsley for Passover).
- If you purchase starter plants, purchase one extra (as large as you can find). Put it aside for the moment.
- Have children prepare soil in potting containers (have holes punched, fill with 2 inches of rock, add soil) and make a deep hole. Carefully remove herbs and place one in each container. Cover the roots with soil being careful not to cover the stem of the plant. Water thoroughly. Place in window with indirect sunlight. Check every 2-3 days to be sure the soil is moist.
- You can trim the leaves of all herbs without killing the plant. In fact, many gardeners argue that the trimming actually causes the plant to produce even more leaves than it otherwise would.
- Take the plant you set aside and remove all of its leaves (at least enough to make a bundle 1 inch thick).
- Squeeze a handful of leaves and tie a piece of yarn around it. Wrap the yarn several times around the length of the bundle to hold the leaves together. Tie one or more colorful feathers to the yarn. Have children smell the scent.
- Add pictures of basil and/or sage to your Poster (See Activity 1)
Back to top